Save Money & Time: Easy Steps to Canning Chickpeas at Home
Imagine reaching into your pantry and pulling out a jar of perfectly cooked, ready-to-use chickpeas – no soaking overnight, no hours of simmering on the stovetop. This isn't just a dream; it's the reality of home canning! Learning how to can chickpeas at home is a game-changer for anyone looking to save time, reduce grocery bills, and take complete control over their food. If you're a fan of these versatile legumes, preparing them yourself can be one of the most rewarding additions to your kitchen routine, providing a staple for countless delicious and wholesome meals.
For home cooks who love a well-stocked pantry, homemade essentials like canned tomatoes, vegetable broth, or pickled cucumbers are invaluable. Chickpeas, also known as garbanzo beans, fit perfectly into this category. While freezing cooked chickpeas is a great option for short-term storage, canning them offers an even longer shelf life, ensuring you always have a healthy, convenient ingredient on hand. The process might seem daunting at first, but with a reliable pressure canner and a few simple steps, you'll be canning chickpeas like a pro in no time.
Why Can Chickpeas at Home? The Benefits You Can't Ignore
Beyond the simple satisfaction of DIY, there are compelling reasons why more people are embracing the art of canning their own chickpeas:
- Unbeatable Convenience & Time Savings: This is arguably the biggest draw. Your home-canned chickpeas are ready to use the moment you open the jar. No last-minute decisions requiring hours of prep. Need a quick hummus? A hearty chickpea salad? A comforting soup? Just grab a jar! This translates to significant time saved during busy weeknights.
- Superior Taste and Texture: Many home canners attest that their homemade chickpeas simply taste better than anything from the store. They have a fresher flavor and a wonderfully creamy, yet firm, texture that mass-produced versions often lack. You can experience this difference for yourself, and understand Unlock Superior Flavor: Why Home-Canned Chickpeas Beat Store-Bought firsthand.
- Cost-Effectiveness: Dried chickpeas are significantly cheaper per pound than their canned counterparts. By buying dried chickpeas in bulk and canning them yourself, you can dramatically cut down on your grocery expenses over time. This smart meal prep strategy allows you to plan your budget for months ahead.
- Complete Control Over Ingredients: When you can chickpeas at home, you dictate what goes into the jar. Want them plain with no added salt? Perfect. Prefer a touch of canning salt for enhanced flavor? That's your choice. You avoid unnecessary preservatives, excessive sodium, or other additives often found in store-bought cans, making them ideal for specific dietary needs or preferences.
- Pantry Stocking & Meal Prep Mastery: A pantry filled with home-canned chickpeas is a foundational element for efficient meal planning. It reduces stress about last-minute grocery runs and empowers you to create delicious, wholesome dishes quickly and spontaneously.
Essential Tools and Ingredients for Canning Success
To embark on your chickpea canning journey, you'll need a few key ingredients and some specialized tools. Don't worry, many of these tools are versatile and can be used for canning a variety of other foods.
The Basics: Ingredients
- Dried Chickpeas (Garbanzo Beans): The star of the show! Choose good quality, fresh dried chickpeas for the best results.
- Water: Plain, cold water for soaking and hot water for filling jars.
- Canning Salt (Optional): If you choose to add salt for flavor, use non-iodized canning salt. Iodine can discolor the chickpeas and anti-caking agents can make the liquid cloudy.
Your Canning Arsenal: Tools
While some items are absolutely critical for safety and success, others are wonderful for convenience.
- Pressure Canner with a Canning Rack: This is non-negotiable for canning low-acid foods like chickpeas. A water bath canner is NOT safe for chickpeas. Ensure your pressure canner is in good working order and has a working pressure gauge or weighted gauge.
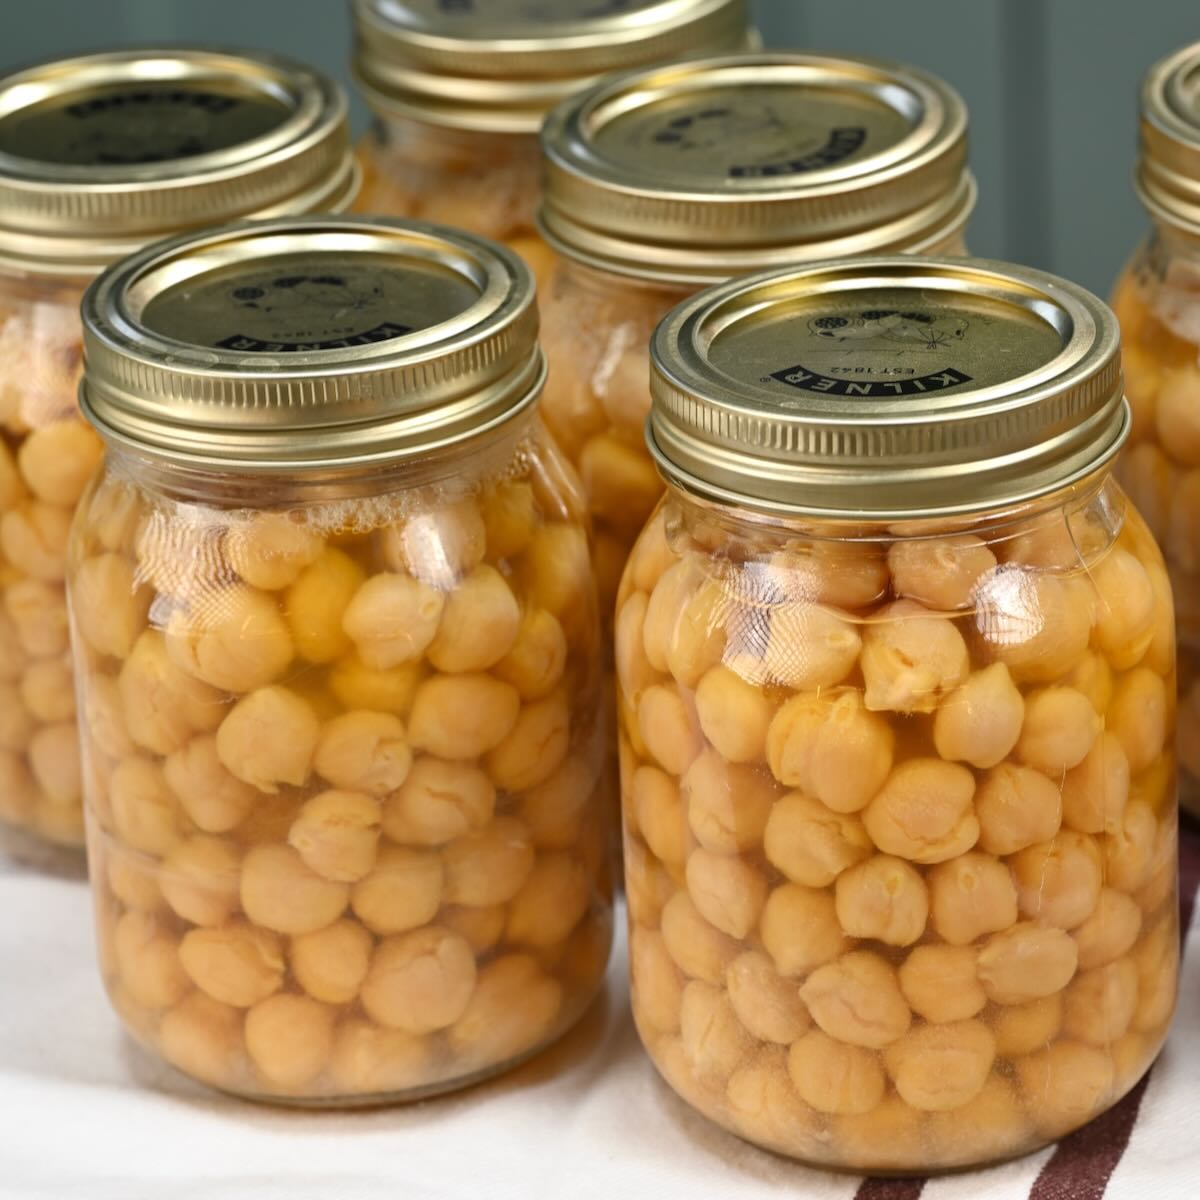
- Glass Canning Jars with Lids & Bands: Pint jars (16 oz) are often recommended for chickpeas, though quart jars (32 oz) can also be used. Always use new lids for each canning session to ensure a proper seal. Bands can be reused if they are in good condition.
- Large Bowl: For soaking the dried chickpeas.
- Ladle or Large Spoon: For transferring chickpeas and hot water into jars.
- Clean Kitchen Cloth and White Vinegar: Essential for wiping jar rims before sealing. Even a tiny bit of food residue can prevent a proper seal.
- Canning Funnel (Optional but Highly Recommended): Helps keep jar rims clean and makes filling much easier.
- Canning Tongs / Jar Lifter (Highly Recommended): For safely handling hot jars.
- Bubble Remover / Headspace Tool (Highly Recommended): To remove air bubbles from jars and measure headspace accurately. A plastic knife or chopstick can be an alternative.
- Magnetic Wand (Optional): Makes retrieving hot lids from simmering water a breeze.
- Jar Wrench (Optional): Helpful for securing bands tightly.
- Labels or Paper and Tape: For clearly labeling your jars with content and date.
Step-by-Step Guide: How to Can Chickpeas Safely and Easily
Mastering how to can chickpeas involves a few distinct stages, each crucial for safety and quality. Always follow USDA guidelines for safe canning practices.
Step 1: The Soak
Soaking the chickpeas is a vital first step, allowing them to rehydrate and soften, which reduces overall processing time and helps achieve that desired creamy texture.
- Sort and Rinse: Pour your dried chickpeas into a colander and rinse them thoroughly under cold running water. Sort through them, discarding any discolored, shriveled, or damaged beans, as well as any small stones or debris.
- Soak Overnight: Place the cleaned chickpeas in a large bowl. Cover them with plenty of cold, plain water – aim for at least 2-3 inches of water above the chickpeas, as they will double or even triple in size. Let them soak for 12-24 hours.
- Drain and Rinse Again: After soaking, drain the chickpeas and rinse them well under running water once more. They should look plump and feel slightly tender.
- Optional Pre-cook (Hot Pack Method): While not strictly necessary for pressure canning, some prefer to pre-cook the soaked chickpeas for 30 minutes in boiling water before packing. This can help achieve an even softer texture. If you choose this, drain them thoroughly after pre-cooking.
Step 2: Jar Preparation
Cleanliness is paramount in canning to prevent spoilage.
- Wash Jars: Wash your glass canning jars, bands, and new lids in hot, soapy water. Rinse them thoroughly.
- Heat Jars: Keep the washed jars hot until ready to fill. You can place them in a simmering water bath, a warm dishwasher, or even in your pressure canner with an inch or two of water. This prevents thermal shock when adding hot chickpeas and water.
- Prepare Lids: Place new lids in a small saucepan of simmering (not boiling) water. Keep them warm until you're ready to place them on the jars.
Step 3: Packing the Jars
This is where your soaked chickpeas find their new home.
- Fill Jars: Using a canning funnel (if you have one), carefully ladle the soaked and drained chickpeas into the hot jars. Fill them loosely, up to about 1 inch from the top of the jar (this is your headspace). Do not pack them too tightly, as they will expand slightly during processing.
- Add Salt (Optional): If desired, add ½ teaspoon of canning salt to pint jars or 1 teaspoon to quart jars.
- Add Hot Water: Pour hot water over the chickpeas, maintaining 1 inch of headspace.
- Remove Air Bubbles: Use your bubble remover tool (or a clean non-metallic utensil) to gently remove any trapped air bubbles by running it around the inside of the jar. Add more hot water if necessary to re-establish the 1-inch headspace.
- Clean Rims: Dip a clean kitchen cloth in white vinegar and carefully wipe the rims of each jar. This ensures no food residue interferes with the lid's seal.
- Apply Lids and Bands: Place a warm, clean lid centered on each jar. Screw on the bands finger-tight – snug but not overly tight, allowing air to escape during processing.
Step 4: Pressure Canning Process
This is the critical step for safely preserving low-acid foods like chickpeas. It's essential to use a pressure canner and follow tested guidelines.
- Load Canner: Place the filled and sealed jars onto the rack in your pressure canner. Ensure the jars are not touching each other or the sides of the canner. Add 2-3 inches of hot water to the canner, or the amount specified by your canner's manufacturer.
- Secure Lid & Vent: Place the lid securely on your pressure canner. Turn up the heat to high. Allow steam to escape from the vent pipe for a full 10 minutes. This "venting" step is crucial for removing all air from the canner, ensuring the correct internal temperature is reached.
- Build Pressure: After venting, place the weighted gauge or pressure regulator on the vent pipe, or close the petcock. Allow the pressure to rise to the recommended PSI (pounds per square inch) for your altitude and canner type. Consult the instructions that came with your pressure canner or reliable canning resources like the USDA National Center for Home Food Preservation. For a deeper dive into the specifics, check out How to Pressure Can Chickpeas: An Easy Guide to Stock Your Pantry.
- Process Jars: Once the correct pressure is reached, begin timing your processing according to USDA recommendations for your jar size and altitude. Maintain a consistent pressure throughout the entire processing time, adjusting heat as needed.
- Cool Down: Once the processing time is complete, turn off the heat and allow the pressure canner to cool down naturally. DO NOT try to rush this process by opening the vent or cooling with water. Wait until the pressure gauge reads zero (or the weighted gauge can be easily removed) before carefully opening the canner lid away from your face.
Step 5: Cooling, Sealing & Storing
- Remove Jars: Using your jar lifter, carefully remove the hot jars from the canner and place them on a clean kitchen towel or a wire rack, ensuring they are not touching. Leave at least an inch of space between jars.
- Cool Naturally: Let the jars cool undisturbed for 12-24 hours. You'll often hear a satisfying "ping" sound as the lids seal.
- Check Seals: After cooling, remove the bands and check each jar's seal. The lid should be concave (curved inward) and not flex when pressed. If any jar did not seal, refrigerate and use within a few days or reprocess within 24 hours with a new lid (ensure you use the correct processing time again).
- Label and Store: Wash the sealed jars to remove any residue. Label them with the contents and date. Store your home-canned chickpeas in a cool, dark, dry place for up to a year.
Creative Ways to Use Your Home-Canned Chickpeas
With a pantry full of home-canned chickpeas, your culinary possibilities are endless!
- Classic Hummus: The creamiest, most flavorful hummus starts with quality chickpeas.
- Hearty Soups and Stews: Add a boost of protein and fiber to minestrone, chili, or a vegetable curry.
- Quick Salads: Toss with fresh veggies, herbs, and a vinaigrette for an instant healthy lunch.
- Roasted Chickpeas: Season and roast for a crunchy, satisfying snack or salad topping.
- Chickpea "Tuna" Salad: A delicious plant-based alternative for sandwiches or wraps.
- Vegetarian Burgers or Falafel: Mash and combine with spices for flavorful patties.
- Curries and Mediterranean Dishes: Chickpeas are a staple in many global cuisines.
Canning chickpeas at home is a skill that truly pays dividends in convenience, flavor, and savings. While it requires an initial investment in tools and a commitment to safety, the reward of a pantry stocked with wholesome, ready-to-use ingredients is immeasurable. Give it a try – you might just find your new favorite kitchen endeavor!
